Dev Prompt Builder helps engineering teams turn a work item into a context-grounded development prompt that can be used directly in coding tools such as Claude Code or Cursor.
Instead of relying only on the work item's description and acceptance criteria, the agent brings together relevant engineering context—including linked specifications, related tickets, prior PRs, curated Code Areas, method-level code references, and configured build benchmarks—and produces a structured development brief.
The agent is intended for Engineers, Engineering Leads, and Engineering Managers.
In simple terms: Dev Prompt Builder gives a developer the context they need to start building, before they start writing code.
What does Dev Prompt Builder do?
A developer typically has access to:
The work item description
Acceptance criteria
The codebase in their IDE
However, useful implementation context may exist elsewhere—for example:
A Confluence, Drive, or OneDrive specification
Similar work that was already implemented
The actual files changed in a previous PR
Curated Code Areas for the relevant domain
Method-level code mappings
Other work items implemented in the same areas
Dependencies and blast-radius information
Workspace-defined benchmark implementations
Dev Prompt Builder brings this context together and generates a structured build brief.
The agent:
Reads the work item requirement and acceptance criteria.
Finds linked specification documents.
Identifies similar previously built work items.
Maps the requirement to curated Code Areas.
Retrieves relevant code pointers and method-level hints.
Uses configured build-task benchmarks where applicable.
Identifies relevant areas and prior implementation history.
Generates a structured development brief.
Posts the brief back to the work item when posting is enabled.
The resulting brief is intended to be pasted directly into a coding tool rather than serving as a generic summary.
Before you start
For Dev Prompt Builder to produce useful results, the workspace should have:
Jira Software or ADO configured as the planning tool.
GitHub or another supported coding integration configured.
Work items with meaningful descriptions and acceptance criteria.
Relevant specifications linked to the work items where applicable.
Code Areas configured for the relevant application or domain.
Similar completed work available where reuse context is expected.
Build benchmarks configured if benchmark-based guidance is required.
Appropriate workspace members configured as the audience.
The agent works with context already available through Cubyts integrations. The agent does not allow the LLM to independently browse the connected systems; data is retrieved through the agent's controlled context and tool flow.
Configure Dev Prompt Builder
To configure the agent, open:
Settings → Agents → Dev Prompt Builder
The configuration is organised into four sections:
Run Configurations
Benchmarks
Audience
Integrations
The agent can be enabled or disabled using the toggle in the top-right corner.
1. Run Configurations
The Run Configurations section controls when the agent runs and how backlog items are evaluated.
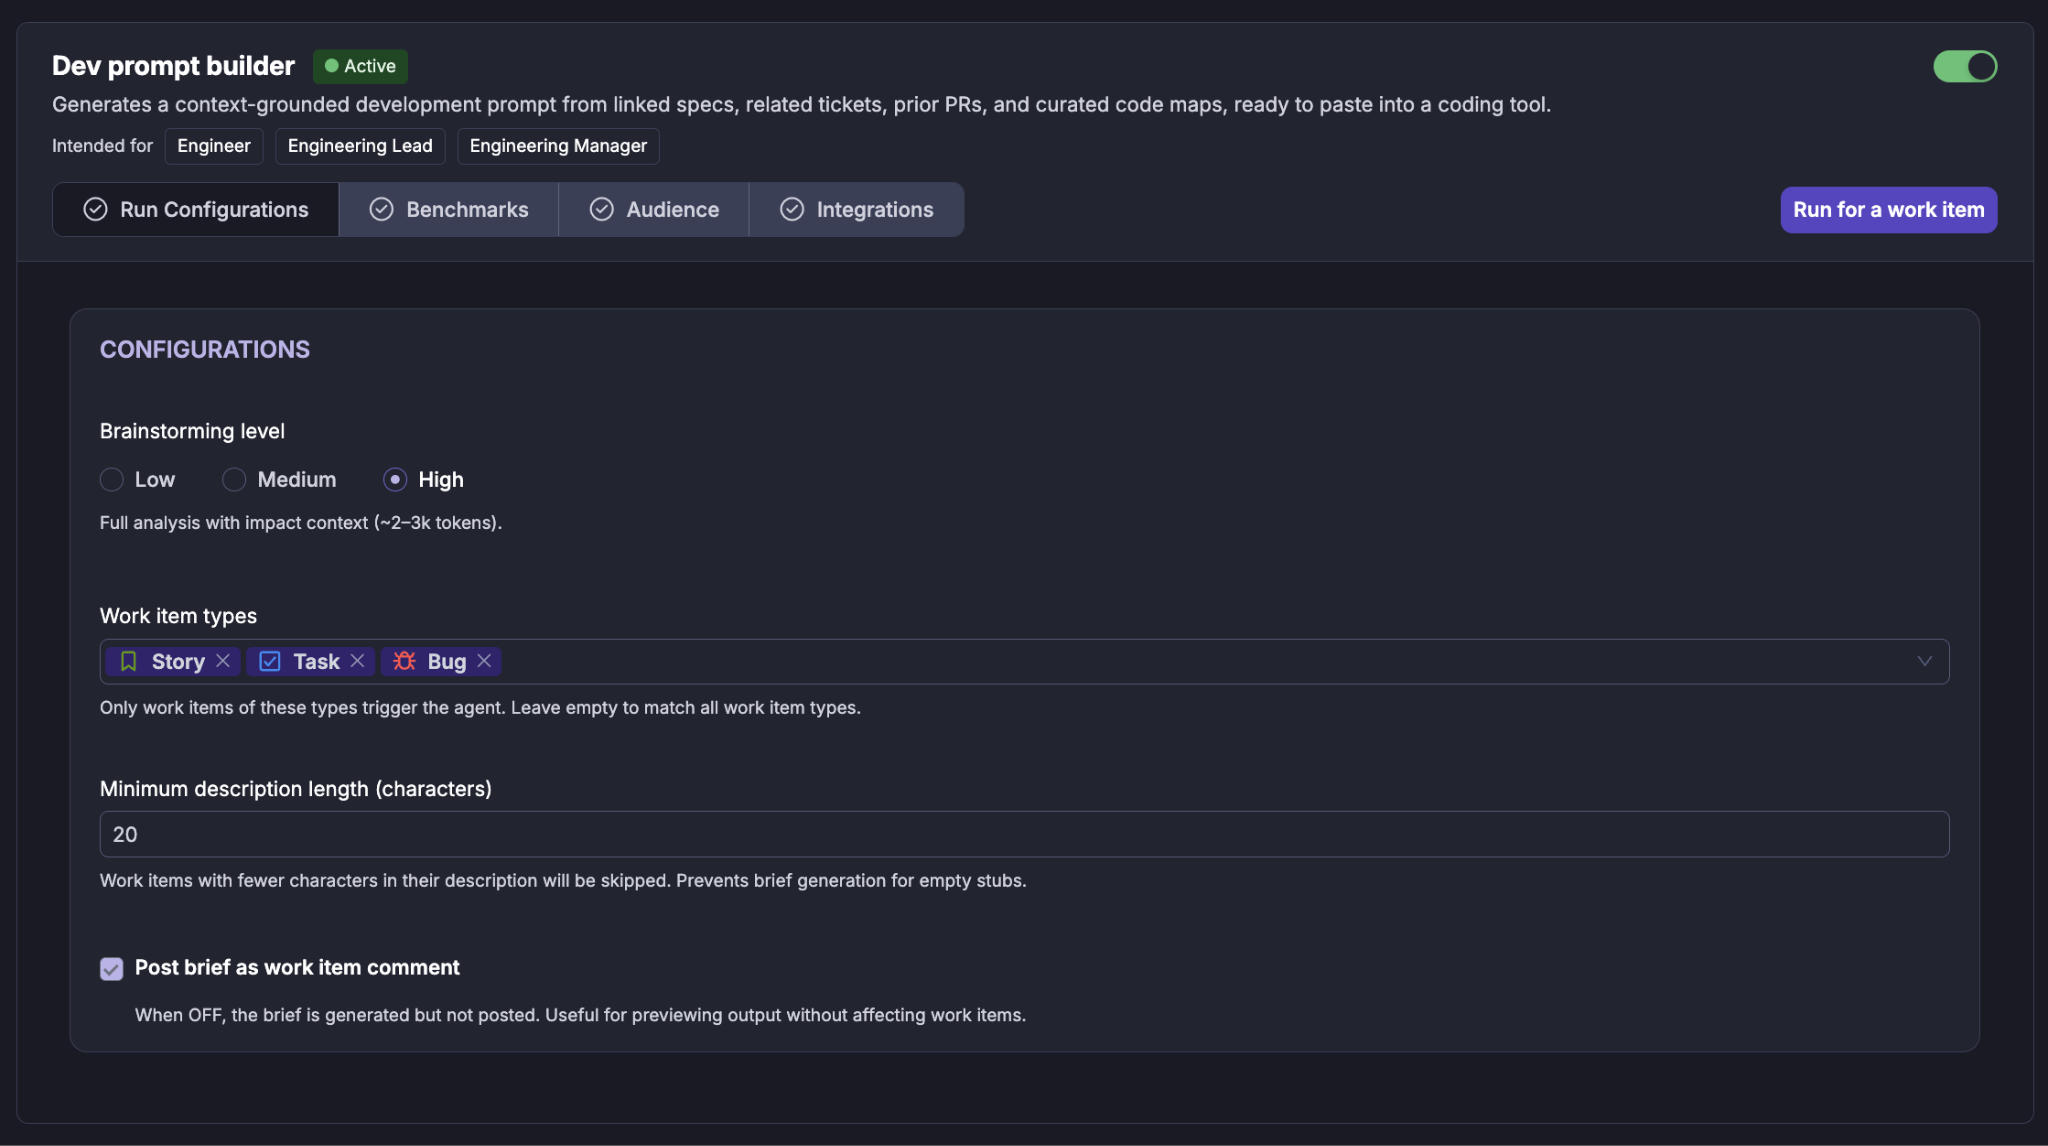
Brainstorming level
The brainstorming level controls the depth of engineering context included when generating the development prompt.
The available levels are: Low, Medium, High
A higher brainstorming level provides deeper code-context analysis and more impact context.
The underlying implementation defines the levels as follows:
The configured example shown in the supplied screen uses High. The implementation documentation identifies Medium as the documented default.
When to use High: Use High when the work item involves:
A significant architectural change
Multiple components or services
Potential downstream impact
A complex or unfamiliar domain
A need for deeper reuse and dependency context
For simpler work items, Medium may provide sufficient context with less analysis overhead.
Work item types
Use Work item types to control which types of work items can trigger the agent (e.g. Story, Task, Bug, etc.).
Only the selected work item types trigger the agent. If the configuration is left empty, the documented behaviour is to match all work item types.
Minimal description length
Minimum description length (characters) defines the minimum amount of description content required before the agent generates a brief.
Work items below the configured threshold can be skipped unless sufficient supporting context, such as linked specifications, is available.
This setting helps prevent the agent from generating a development brief from an empty or extremely short work-item description.
Post brief as work item comment
When Post brief as work item comment is enabled, the generated development brief is posted directly to the work item.
When it is disabled:
The brief is still generated.
The brief is not posted back to the work item.
This can be used as a preview or dry-run mode.
The supplied configuration screen shows this option enabled.
2. Benchmarks
The Benchmarks section allows the workspace to define reference implementations for different types of build work.
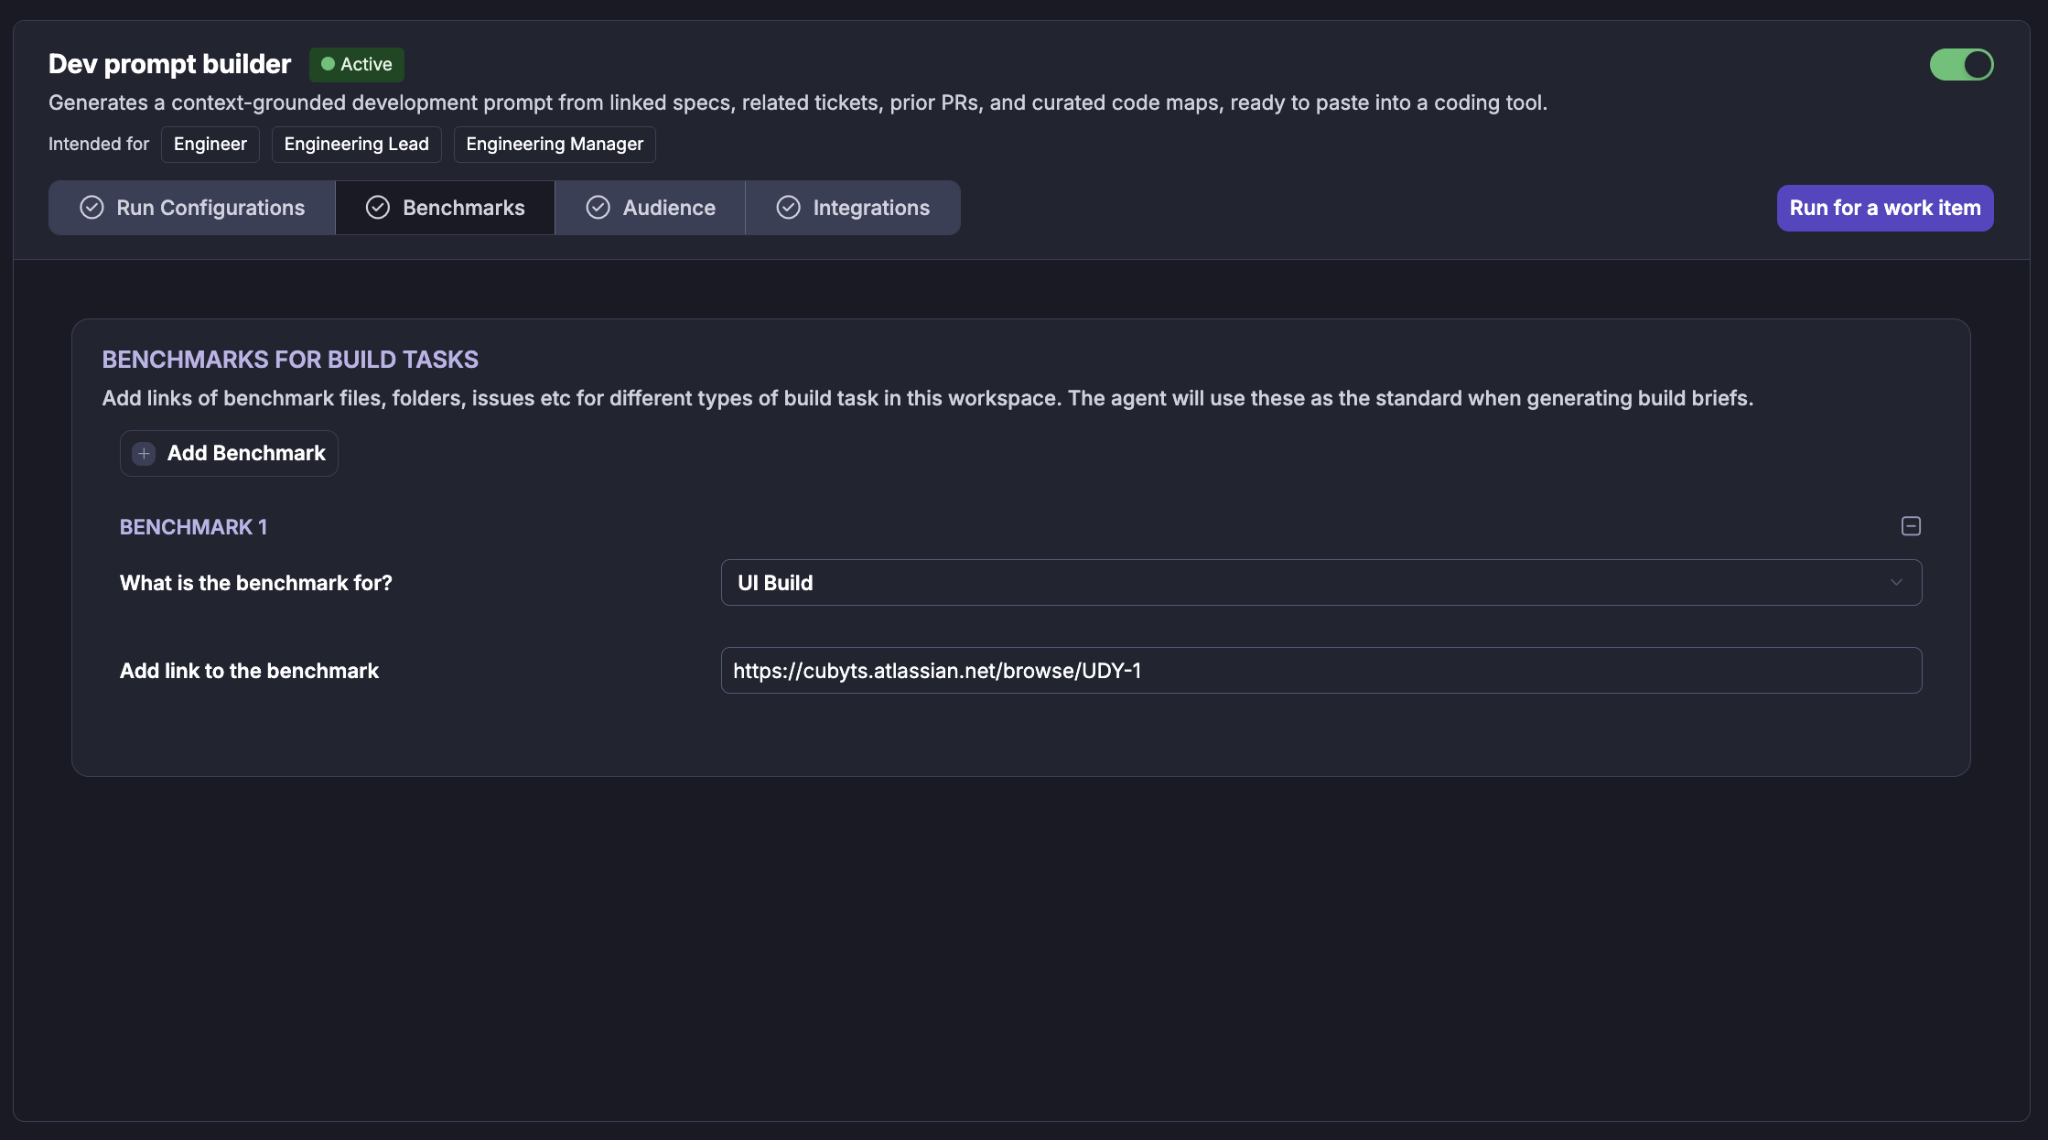
You can add benchmark links for different build-task types. For example, a workspace may define a reference implementation for:
UI Build
API development
Backend development
Database work
DevOps work
The benchmark provides the agent with a gold-standard implementation reference when generating a development brief.
Adding a benchmark
Select:
Add Benchmark
For each benchmark:
Select what the benchmark is for.
Add the link to the benchmark work item.
Save the configuration.
The implementation resolves the benchmark work item and can use its description, acceptance criteria, and attached documents as contextual constraints for the generated brief. It does not treat the benchmark as a drift comparison.
Why benchmarks are useful
Benchmarks help the agent answer questions such as:
What does a good implementation of this type look like?
What patterns should the developer follow?
What acceptance-criteria structure is expected?
Are there known implementation references for this type of work?
2. Audience
The Audience section determines who receives the results of the agent.
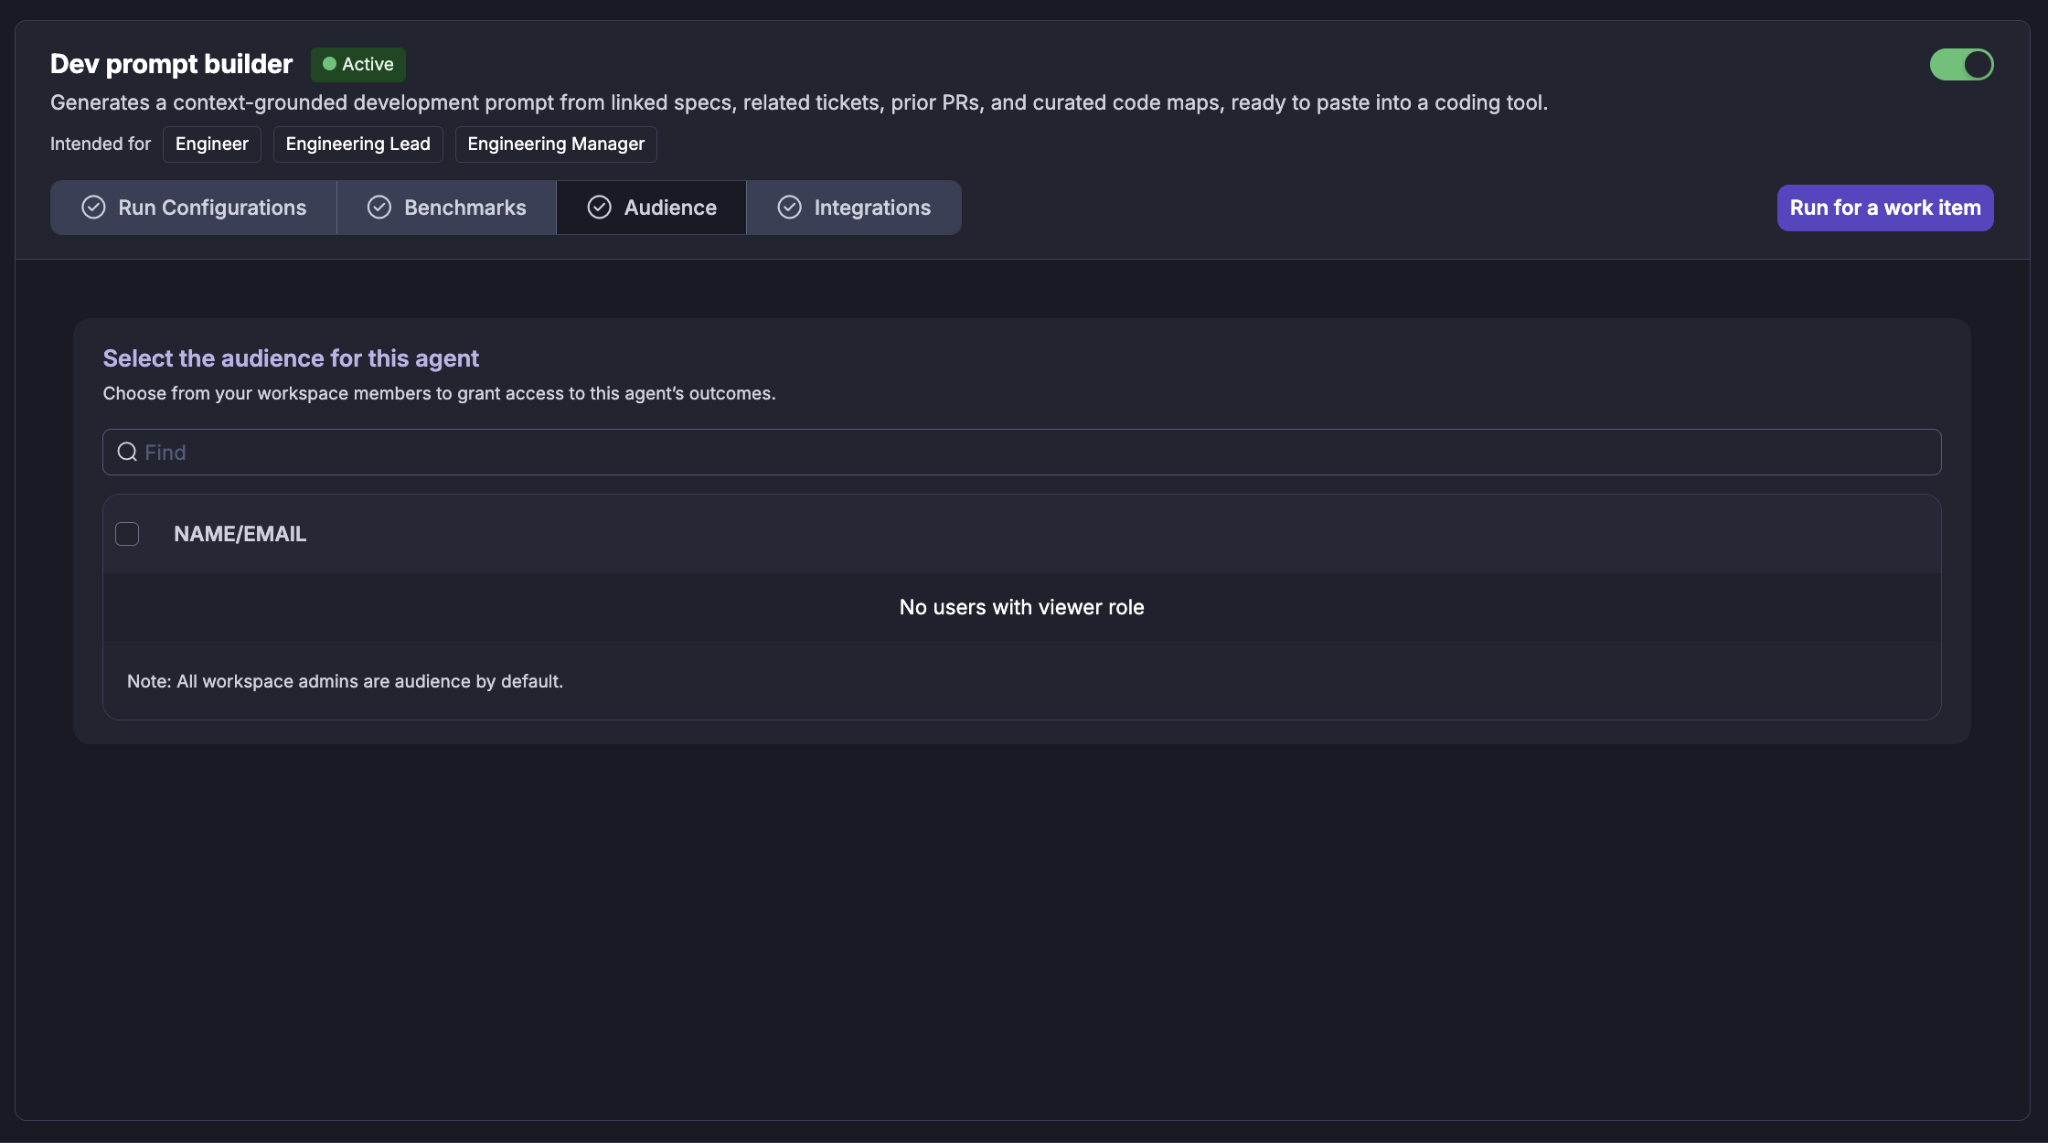
Select the workspace members (Viewers) who should have access to the agent's outcomes.
Selecting users
Use the Find field to search for a workspace member by name or email. Select the required users using the checkbox next to their name.
Workspace administrators are included as audience members by default.
If there are no users with the required viewer role, the audience list will indicate that no eligible users are available.
3. Integrations
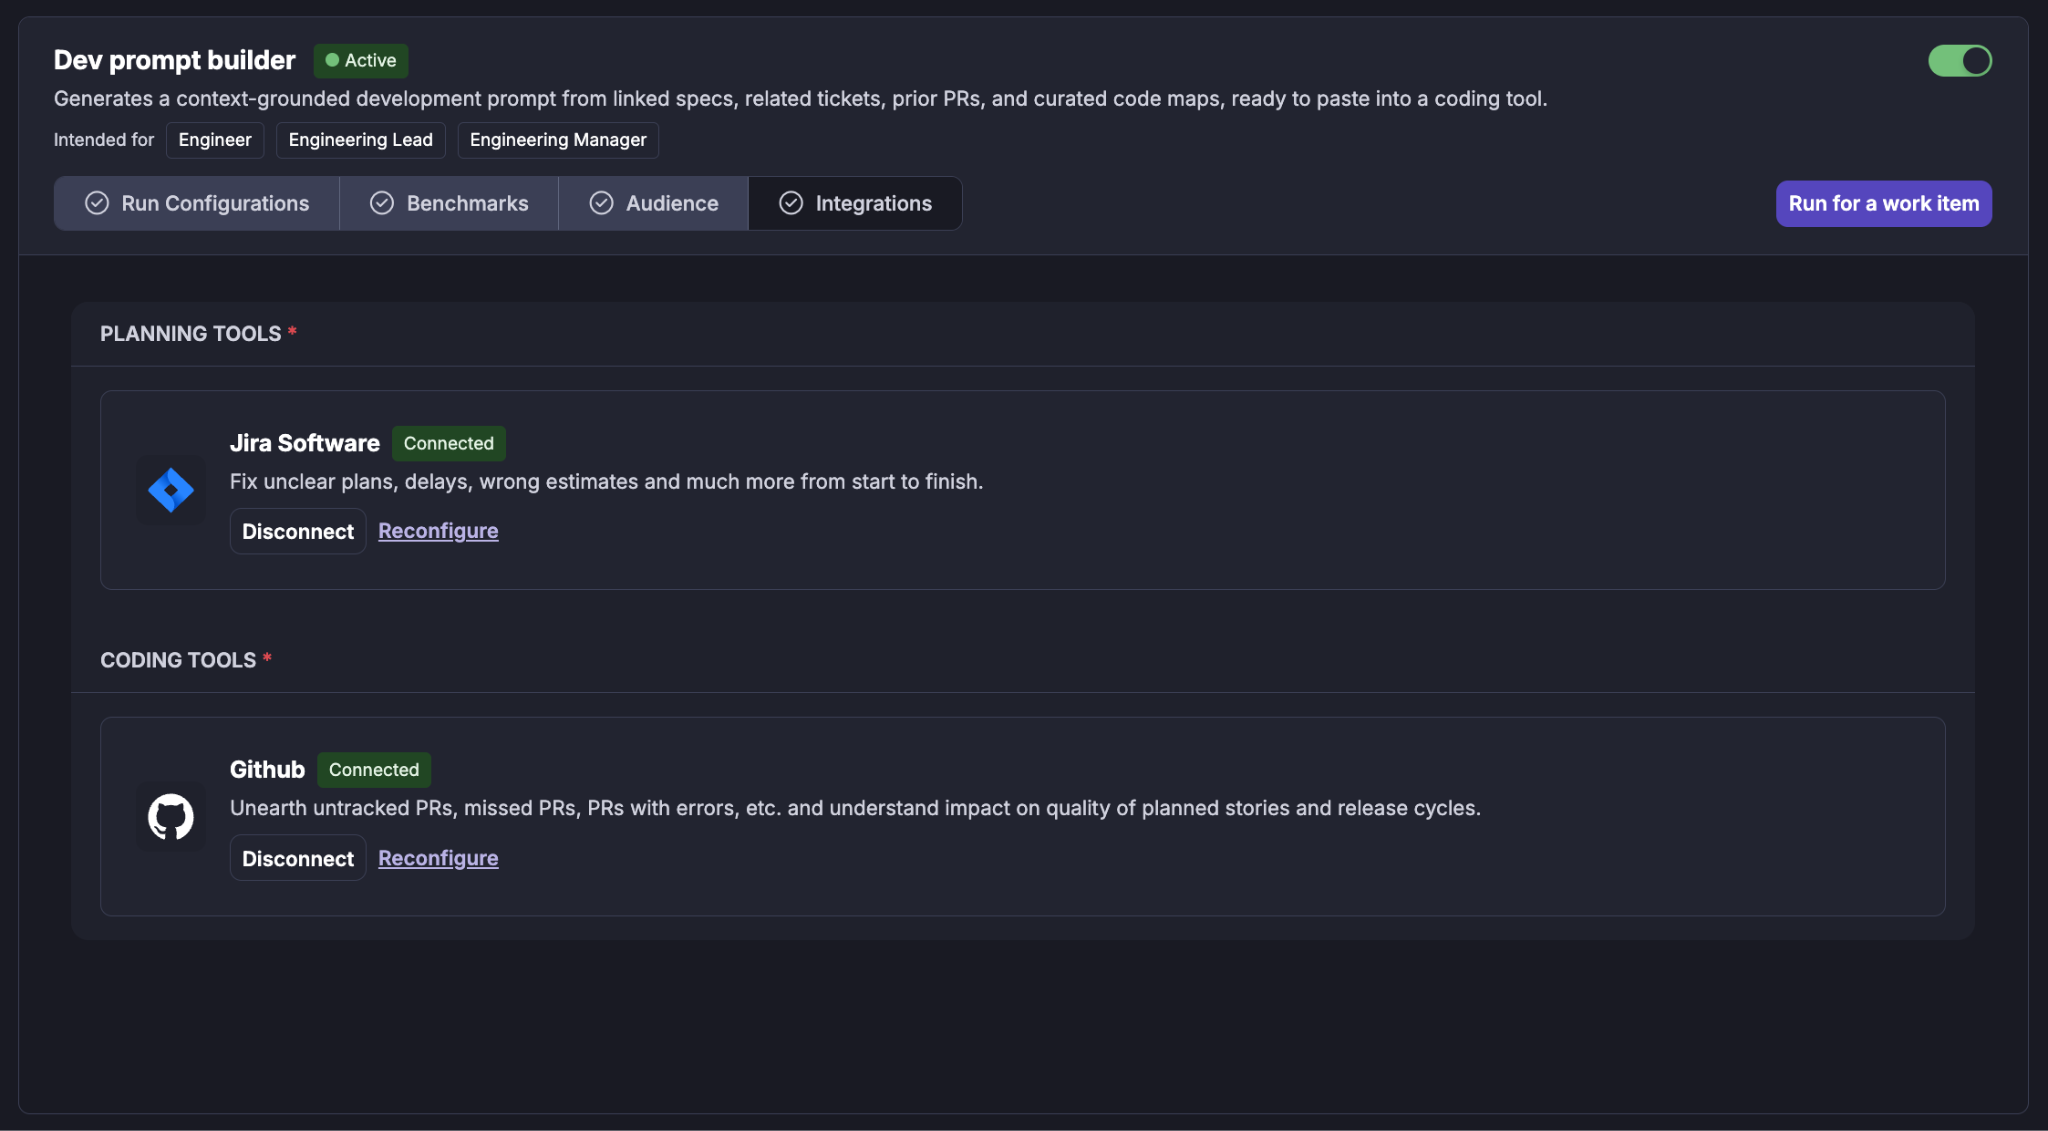
The Integrations section shows the tools required by the agent.
The integrations are grouped according to their purpose.
Planning Tools
The planning integration provides the work-item context that the agent uses as the starting point for the brief.
This includes information such as:
Work item description
Acceptance criteria
Work item status
Related work-item context
Linked specifications
The integration can be disconnected or reconfigured from this screen.
Coding Tools
The coding integration provides engineering context that helps the agent ground the development brief in the actual codebase.
This context can include:
Curated Code Areas
Relevant files
Prior changed files
Method-level code references
Related implementation history
Code dependencies
The implementation specifically separates requirement comprehension from code grounding: Phase 1 retrieves the requirement and specification context, while Phase 2 retrieves code context scaled to the configured brainstorming level.
Running Dev Prompt Builder
Dev Prompt Builder can be invoked in multiple ways.
Automatic execution
The agent is designed to generate a development brief when a Jira or ADO work item moves into In Progress.
The normal flow is:
Work item → In Progress → Context retrieval → Development brief → Work item comment
The implementation supports webhook-driven execution as well as scheduled context loads that act as a catch-all for work items that may have been missed by the webhook path.
Manual run
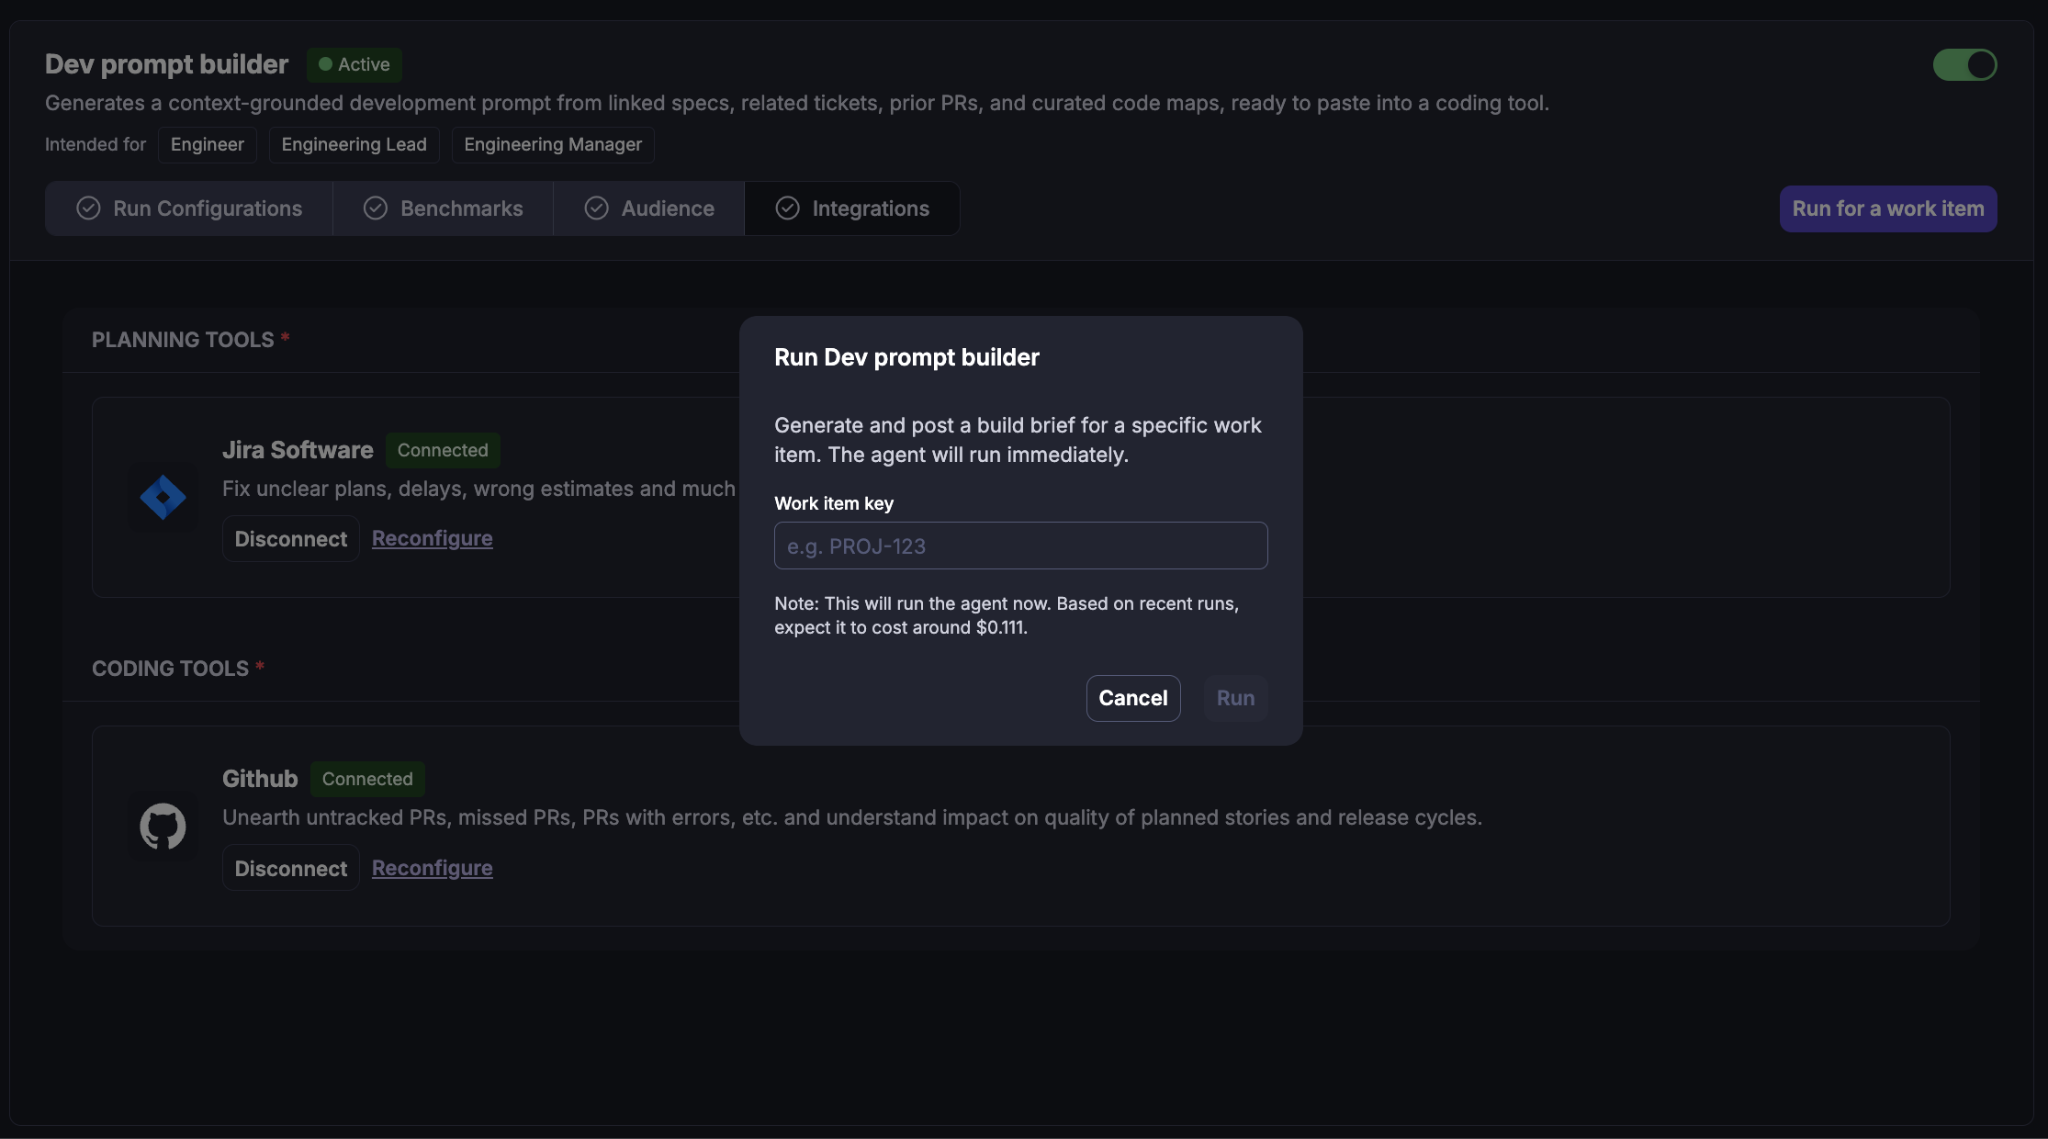
You can also run the agent immediately using: Run for a work item
When selected, Cubyts opens the Run Dev Prompt Builder dialog.
Enter the Work item key, for example:
PROJ-123
The dialog confirms that the agent will: Generate and post a build brief for a specific work item.
It also displays an estimated execution cost based on recent runs. The supplied example shows an estimated cost of approximately $0.111.
The user can either: Cancel or Run
The displayed cost is an estimate shown before execution.
Manual runs are useful when:
A developer wants the brief immediately.
A work item was created before the agent was enabled.
The work item needs to be reprocessed.
You want to validate the generated context before development begins.
What happens during a run?
Once Dev Prompt Builder starts, it follows a controlled sequence.
Step 1: Understand the requirement
The agent retrieves:
Work item description
Acceptance criteria
Linked specifications
Similar work items
It establishes what the work item is actually asking for before looking at code.
Step 2: Ground the requirement in engineering context
The agent then retrieves relevant engineering context.
Depending on the brainstorming level, this can include:
Curated Code Area files
Previously built sibling work items
Actual changed files from prior PRs
Method-level code links
Work-item history for the relevant areas
Area dependencies
The objective is to provide implementation context, not simply repeat the work-item description.
Step 3: Apply benchmark context
If a matching benchmark has been configured, the benchmark is included as an additional reference.
The benchmark is treated as a constraint or implementation reference, rather than as a comparison report.
Step 4: Generate the development brief
The LLM synthesises the retrieved context into a structured development prompt.
The implementation uses a defined brief composition and grounding mechanism to prevent the agent from posting a completely ungrounded brief.
Step 5: Post the brief
When posting is enabled, the agent posts the result to the work item.
The generated output consists of:
A short headline comment.
The complete development brief.
An example headline is: Build brief ready — 8 code pointers, 2 specs, AC consolidated.
The full brief is intended to be copied into a coding assistant such as Claude Code or Cursor.
Understanding the Development Brief
The generated brief follows a consistent structure.
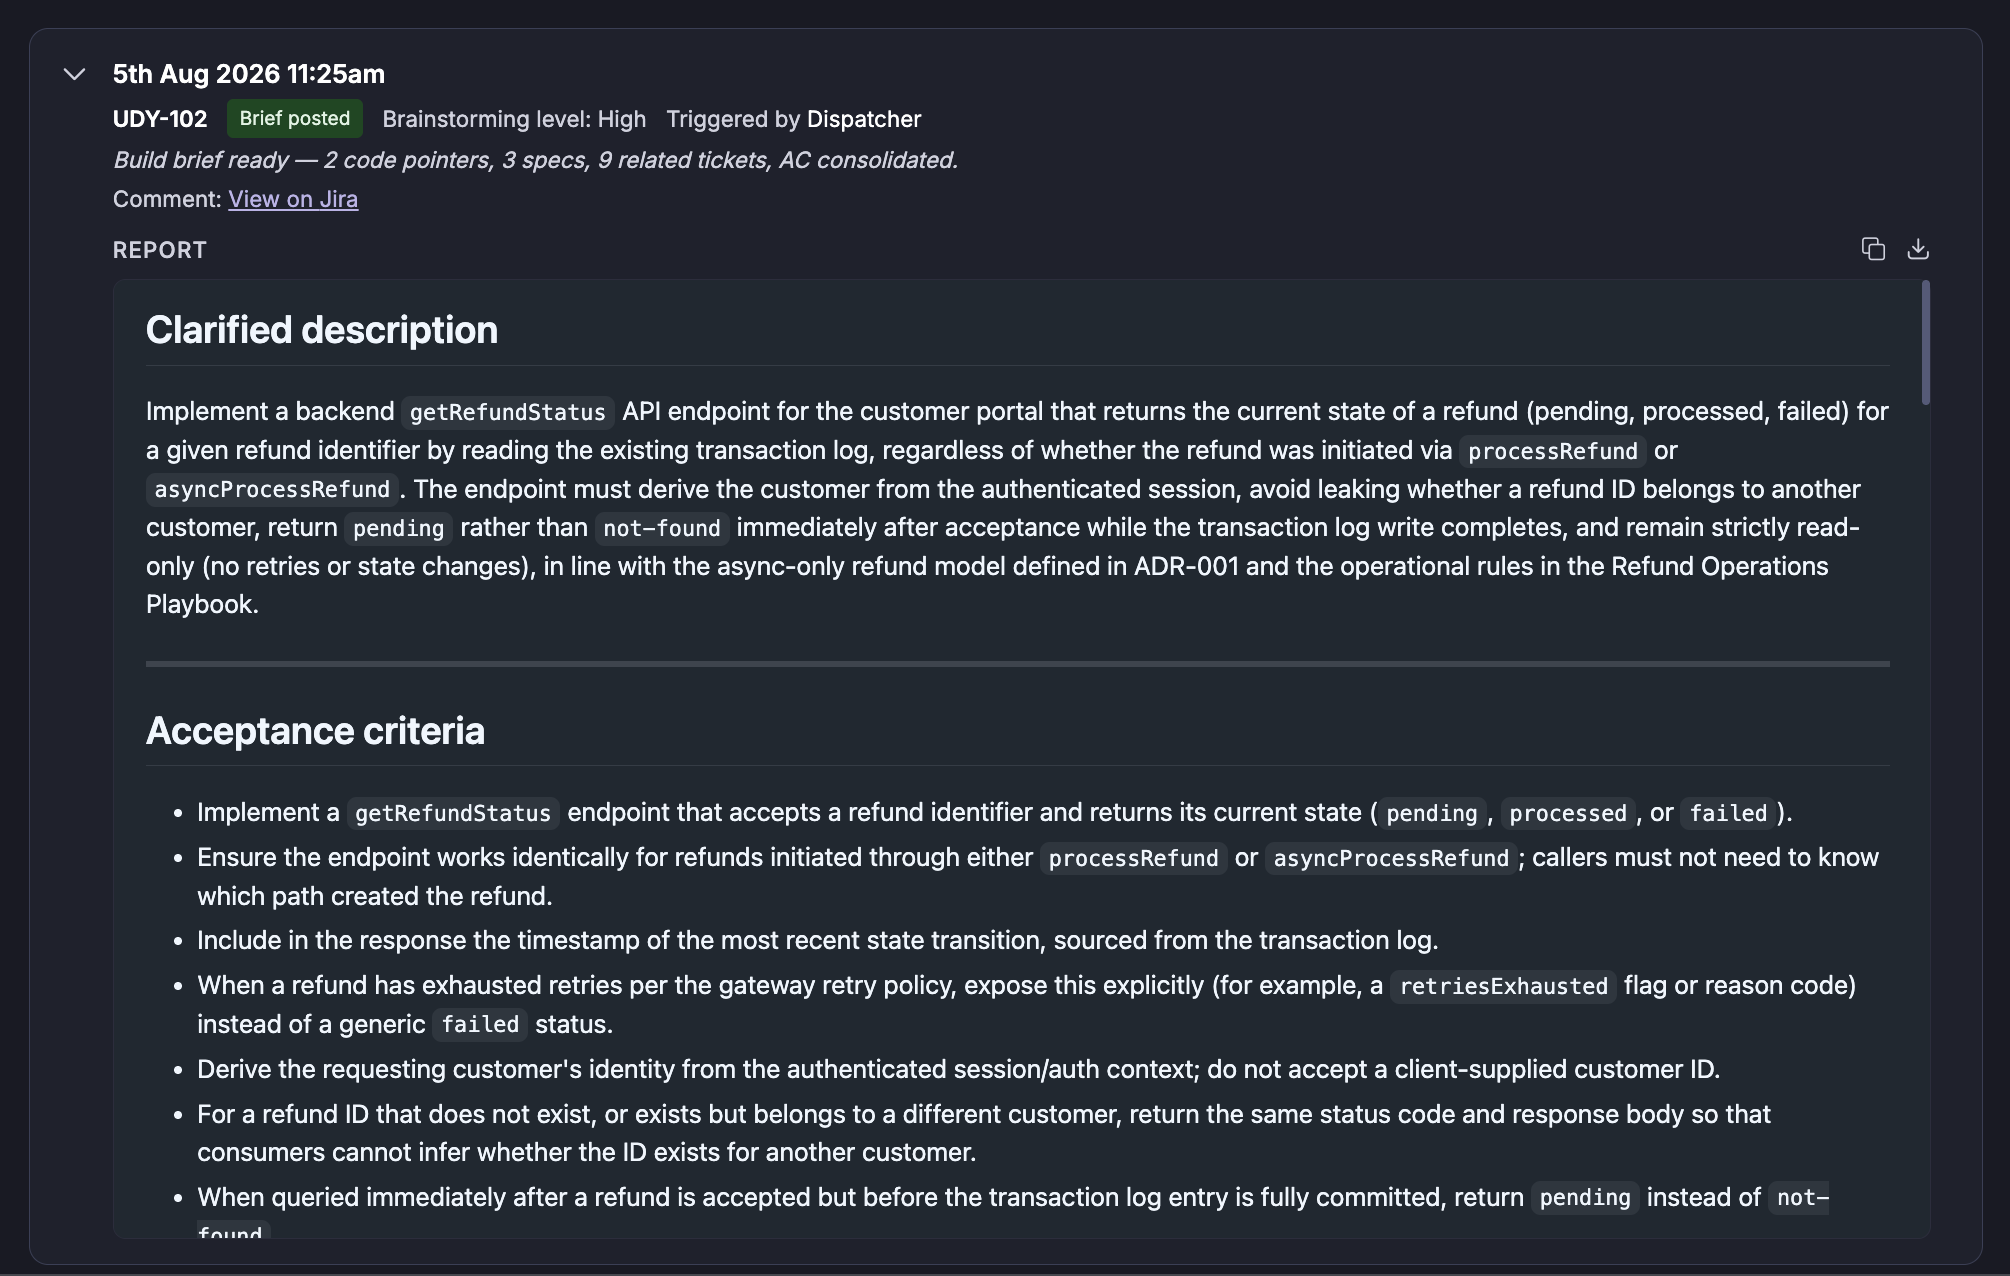
1. Clarified description
This section explains what the work item is actually asking the developer to build.
It can:
Clarify ambiguous requirements
Establish scope boundaries
Consolidate the intended behaviour
Highlight important implementation constraints
The purpose is to give the developer a clear starting point.
2. Acceptance criteria
The brief consolidates acceptance criteria from:
The work item
Relevant linked specification documents
Where additional criteria come from supporting documents, the source is identified.
This helps prevent important requirements from being overlooked simply because they were documented outside the work item.
3. Code pointers
This section provides relevant code locations identified through the curated code map and method-level context.
The pointers are intended as: Where to look and what to reuse
rather than as an automatic instruction that these are definitely the files that must be changed.
This distinction is important because the agent provides development guidance while leaving the final implementation decision to the developer.
4. Relevant areas
This section describes the logical engineering areas relevant to the work.
It can include:
Code Areas
Related work items
Historical implementation context
Dependencies
Potential blast-radius information
The amount of information depends on the selected brainstorming level.
5. Related specifications
The brief lists relevant specification documents and provides a short summary of their relevance.
This makes external requirements available alongside the work item instead of requiring the developer to independently locate and interpret every linked document.
6. Related tickets / prior PRs
This section highlights similar work that has already been implemented.
Where available, the agent provides:
Related work item
Prior PR
Actual changed files
Reuse signals
This is particularly useful for identifying established implementation patterns.
The developer README describes built-sibling reuse as one of the highest-value engineering grounding signals.
7. Footer
The brief ends with execution metadata such as:
Brainstorming level
Confidence
This helps users understand the context depth used to generate the brief and provides a reference for the corresponding agent run.
8. Reference benchmarks in the brief
When a matching benchmark is available, it is surfaced separately in the development brief. The benchmark provides an implementation reference that the developer can use when planning the work.
If no applicable benchmark is configured or found, this section is omitted.
Skip conditions
The agent may decide not to generate a brief when there is insufficient information or execution should not proceed.
Common skip conditions include:
Manual execution is treated differently and can bypass some automatic execution guards.
Important boundaries
Dev Prompt Builder is a development decision-support and context-generation agent.
It does not replace the developer.
The agent does not:
Automatically implement the work item.
Modify source code.
Automatically decide which files must be changed.
Replace engineering judgement.
Automatically resolve implementation dependencies.
Guarantee that every code pointer will be changed.
Replace code review or testing.
Its role is to provide the developer with better context before implementation begins.
The generated pointers should therefore be treated as grounded recommendations rather than mandatory implementation instructions.
Summary
Dev Prompt Builder gives engineering teams a context-grounded starting point for implementation.
It combines:
Work-item requirements
Acceptance criteria
Linked specifications
Similar completed work
Curated Code Areas
Code pointers
Method-level context
Prior PR information
Build-task benchmarks
Dependency context
Configured brainstorming depth
to generate a structured development brief that can be used directly with a coding tool.
The result is not simply a summary of the ticket. It is a context-grounded development prompt that helps developers understand what to build, where to look, what existing implementation patterns to consider, and what supporting context matters before they start coding.
Was this article helpful?
That’s Great!
Thank you for your feedback
Sorry! We couldn't be helpful
Thank you for your feedback
Feedback sent
We appreciate your effort and will try to fix the article